Best LED Lights for Seedlings: A Beginner-Friendly Guide to Strong, Healthy Starts
Starting seeds indoors can feel a little magical. Tiny sprouts appear, and suddenly your future garden is underway. But if your seedlings do not get enough light, they can quickly turn tall, pale, and weak.
That is why choosing the best LED lights for seedlings matters so much. The good news is that you do not need a complicated setup or expensive gear to grow sturdy, healthy young plants at home.
Why This Topic Matters
Light is one of the biggest factors in seedling success. Even if you use great seed-starting mix, keep the soil evenly moist, and plant at the right time, poor lighting can still hold your plants back.
Most windows simply do not provide enough consistent light for seedlings, especially in late winter and early spring. A sunny window may look bright to us, but seedlings often need more direct, even light than a windowsill can offer.
When seedlings do not get enough light, they stretch toward the source. Gardeners call this becoming “leggy.” Leggy seedlings have thin stems, weak growth, and a harder time adjusting outdoors later.
Good LED lights solve this problem by giving seedlings steady, reliable light every day. They also stay cooler than older lighting options, use less electricity, and are easy to place over shelves, tables, or seed-starting racks.
For beginners, LED lights can make seed starting much more forgiving. Instead of hoping the weather cooperates, you can create a simple indoor growing space that helps your plants get a strong, healthy start.
Quick Answer
The best LED lights for seedlings are usually full-spectrum LED grow lights or daylight-colored LED shop lights in the 5000K to 6500K range. For most home gardeners, the best choice is a bar-style or strip-style LED light that provides even coverage over a tray, hangs easily, and can be adjusted as seedlings grow.
Look for these beginner-friendly features:
- Full-spectrum or daylight white light
- Low heat output
- Adjustable height
- Even coverage across the whole tray
- Energy efficiency
- Simple setup with a timer option
In practical terms, many beginners do best with a light that sits a few inches above the seedlings and runs for 12 to 16 hours a day. You do not need the strongest light on the market. In fact, overly intense lights designed for mature fruiting plants can be too much for delicate seedlings.
If you want the simplest rule of thumb, choose a white full-spectrum LED grow light made for seed starting, or a bright 5000K–6500K LED shop light, and position it close enough to prevent stretching without overheating the plants.
Step-by-Step Guide
1. Decide what type of LED light fits your space
There are a few common types of LED lights used for seedlings. The best option depends on how many trays you want to grow and where you plan to keep them.
Bar or strip LED grow lights are one of the easiest choices for beginners. They spread light evenly across a tray or shelf and are simple to hang or mount.
LED shop lights are another good budget-friendly option. If they are bright and in the daylight range, they can work very well for seedlings.
Panel grow lights are more common in indoor growing rooms. They can be useful, but some are stronger than seedlings need and may light a small center area more intensely than the edges.
For most home vegetable gardeners, bar-style lights are the easiest to work with. They fit shelves well and help avoid dim corners.
2. Choose the right light color and spectrum
You do not need to overthink spectrum as a beginner. Seedlings grow well under full-spectrum white LEDs or cool/daylight white lights in the 5000K to 6500K range.
Many people still picture purple “blurple” grow lights when they think of indoor gardening. While some can grow plants, white lights are usually easier to work with, easier on the eyes, and often better for spotting issues like yellowing leaves or dry soil.
If the package says “full spectrum,” that is usually a good sign. If it is a standard LED shop light, check the color temperature and aim for daylight tones rather than warm yellow household lighting.
3. Make sure the light is bright enough
Brightness matters more than fancy marketing words. Seedlings need enough intensity to stay short, sturdy, and green.
Many brands use different ways to describe output, which can be confusing. You may see watts, lumens, or terms like PPFD. For beginners, the easiest approach is to choose a light specifically intended for seedlings or leafy growth and make sure it provides strong, even coverage across your tray.
A weak light placed high above the plants is one of the main causes of leggy seedlings. Even a decent light will not perform well if it is too far away.
4. Match the light size to your seed trays
A common mistake is using a small light over a large tray. The seedlings in the middle may do fine while those at the edges stretch toward the center.
Try to match the light length and width to the area you are growing. If you are lighting a standard tray on a shelf, a long bar or a pair of bars often works better than a single compact bulb.
Even light distribution is especially important if you are growing several kinds of vegetables together. You want tomatoes, peppers, lettuce, and brassicas to all receive similar exposure.
5. Hang the light at the proper height
Most seedling lights work best when they are kept fairly close to the plants. For many bar-style LEDs or shop lights, that means about 2 to 4 inches above the tops of the seedlings. Stronger fixtures may need to be kept farther away.
The goal is simple: close enough to prevent stretching, but not so close that leaves bleach, curl, or dry out. Check your plants daily at first and adjust as needed.
As seedlings grow, raise the light so it stays at a consistent distance. An adjustable chain, shelf, or hook system makes this much easier.
6. Set a daily lighting schedule
Seedlings need a long, steady day length. Most vegetables do well with 12 to 16 hours of light per day.
More is not always better. Plants also need a dark period to rest, so avoid leaving lights on 24 hours a day.
A simple outlet timer is one of the best tools you can buy. It keeps your schedule consistent and saves you from remembering to switch the lights on and off.
7. Watch how your seedlings respond
Your plants will tell you a lot about whether the light is working. Healthy seedlings usually look compact, upright, and evenly green.
Signs the light may be too weak or too far away include:
- Long, thin stems
- Leaning toward the light
- Pale leaves
- Wide spacing between leaves
Signs the light may be too intense or too close include:
- Bleached or faded leaf color
- Crispy leaf edges
- Curling leaves
- Very dry soil surface
Small adjustments in distance often solve the problem quickly.
8. Support good airflow and moisture management
Even the best LED lights for seedlings cannot fix poor growing conditions. Seedlings also need proper watering, air circulation, and moderate warmth.
Keep the seed-starting mix lightly moist, not soggy. Use trays with drainage, and empty standing water after bottom watering.
A small fan on a gentle setting can help strengthen stems and reduce stagnant air. It does not need to blow directly on the seedlings. Just enough movement to mimic a light breeze is helpful.
9. Thin crowded seedlings
When several seedlings sprout in one cell, they compete for the same light. Crowding encourages stretching and weak growth.
Once the seedlings have their first true leaves, thin extras by snipping the weaker ones at soil level. It can feel hard, but the remaining plant will be stronger for it.
10. Harden seedlings off before planting outdoors
Strong indoor growth is only part of the process. Seedlings grown under LED lights still need time to adjust to outdoor sun, wind, and changing temperatures.
About a week or two before transplanting, begin hardening them off slowly. Start with short periods outdoors in a protected spot and gradually increase exposure each day.
This step helps prevent shock and sunscald. Even healthy seedlings can struggle if moved straight from indoor lights to full outdoor conditions.
Common Beginner Mistakes
One of the biggest mistakes is assuming any lamp will work. Regular household bulbs often do not provide the right intensity or coverage for a tray of seedlings.
Another common problem is hanging the light too high. Seedlings need the light close enough to keep growth compact. If your plants are stretching, the first fix is usually lowering the light or increasing brightness.
Some beginners leave lights on all day and all night. Seedlings grow best with a regular rhythm, so give them darkness each day too.
Crowding is another issue. When too many seedlings share a small area, they shade each other and compete for space. Thinning them early makes a big difference.
Here are a few more mistakes to avoid:
- Using warm yellow bulbs instead of daylight or full-spectrum LEDs
- Lighting only the center of the tray and ignoring the edges
- Forgetting to raise the light as seedlings grow
- Overwatering because the soil surface looks dry under lights
- Skipping hardening off before transplanting outdoors
The good news is that these mistakes are easy to correct once you know what to watch for.
Best Tips for Success
Start simple. You do not need a complicated indoor grow room to raise healthy vegetable seedlings.
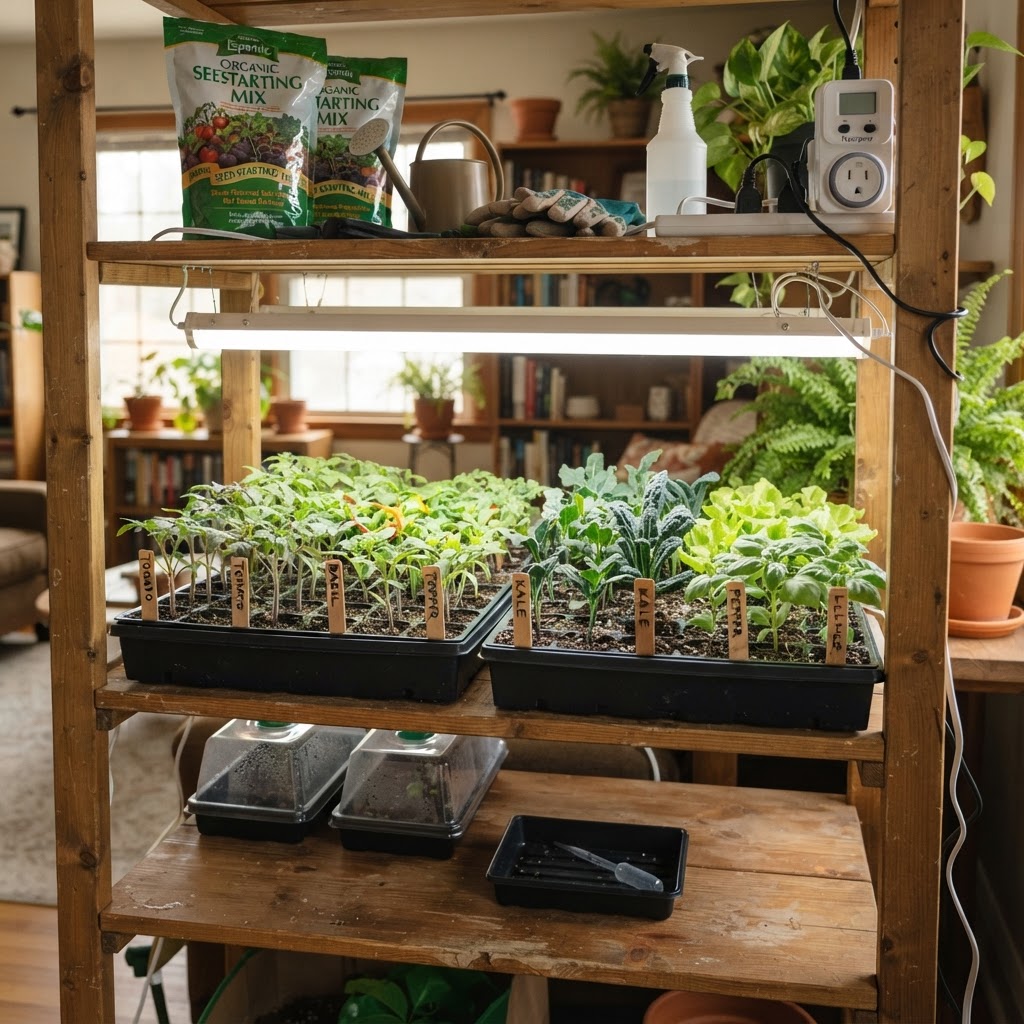
Choose a setup that matches your real space and gardening goals. One sturdy shelf with adjustable LED bars can produce plenty of plants for a home garden.
Keep these tips in mind:
- Prioritize even coverage over flashy features
- Use a timer for consistency
- Keep lights close and adjust often
- Rotate trays if one side gets less light
- Label your seedlings so you can compare growth
- Use a small fan for stronger stems
- Check daily for stretching, dryness, or crowding
It also helps to remember that different crops grow at different speeds. Tomatoes may shoot up quickly, while onions and celery stay smaller longer. The best light setup is one you can easily adjust as those differences show up.
If you are choosing between a very cheap weak light and a solid mid-range light with good coverage, the better coverage usually wins. Seedlings respond more to consistent, usable light than to impressive packaging claims.
Recommended Supplies or Tools
You do not need a huge list of equipment, but a few basic tools make indoor seed starting much easier.
Here are the most useful supplies to pair with LED seedling lights:
- Full-spectrum LED grow bars or daylight LED shop lights
- Adjustable hanging chains, hooks, or shelf brackets
- Outlet timer
- Seed-starting trays with drainage
- Humidity dome for germination only
- Quality seed-starting mix
- Plant labels and a marker
- Small fan for gentle airflow
- Watering tray or bottom-watering setup
- Heat mat for warm-season crops like peppers and tomatoes
A timer and adjustable light support system are especially helpful. They remove guesswork and make your setup easier to manage day by day.
If you are on a budget, focus first on the essentials: a good light, a way to hang it close to the plants, and trays with proper drainage. That simple combination can go a long way.
Frequently Asked Questions
Can I use regular LED bulbs for seedlings?
Sometimes, but they are not usually the best choice. A regular bulb may work for a very small number of seedlings if it is bright enough and placed close, but most household bulbs do not provide even coverage across a full tray. Bar-style grow lights or bright daylight LED shop lights are usually more effective.
How many hours a day should seedlings stay under LED lights?
Most vegetable seedlings do well with 12 to 16 hours of light per day. A timer makes this easy and helps create a consistent routine. Avoid keeping lights on all day and night.
How close should LED lights be to seedlings?
For many seedling setups, keeping the light about 2 to 4 inches above the seedlings works well. Stronger fixtures may need more distance, so always watch the plants for signs of stress. If seedlings stretch, move the light closer or improve light intensity.
Are purple grow lights better than white LED lights?
Not necessarily. Many seedlings grow very well under white full-spectrum LEDs, and these are often easier for home gardeners to use. White lights also make it easier to see plant color, moisture levels, and early signs of problems.
What is the best LED light style for beginner seed starting?
For most beginners, bar-style full-spectrum LED grow lights are the easiest choice. They provide even coverage, fit neatly over trays or shelves, and are simple to raise as seedlings grow. Daylight LED shop lights can also work very well when used correctly.
Final Thoughts
The best LED lights for seedlings are the ones that provide bright, even, adjustable light without making your setup complicated. For most beginners, a white full-spectrum grow bar or a daylight LED shop light is a practical, reliable place to start.
If you keep the light close, use a timer, and watch your seedlings each day, you will be well on your way to growing sturdy young plants ready for the garden. A simple indoor lighting setup can make seed starting easier, more successful, and a lot more enjoyable.