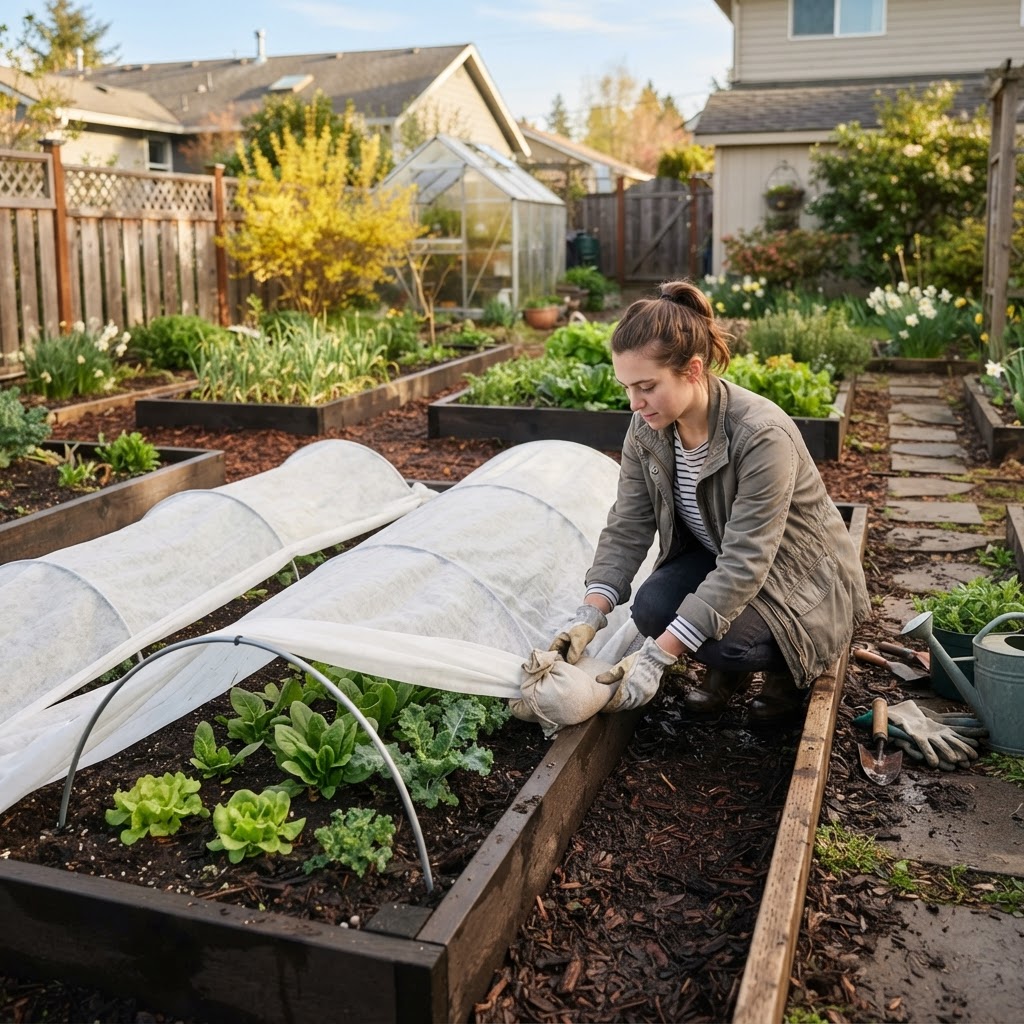
How to Extend the Growing Season With Row Covers: A Beginner-Friendly Guide
If you want to harvest vegetables earlier in spring and keep your garden producing later into fall, row covers are one of the simplest tools you can use. They are affordable, easy to set up, and beginner-friendly, yet they can make a noticeable difference in plant growth and frost protection.
Why This Topic Matters
Many home gardeners have a short growing season, especially in cooler climates or areas with unpredictable weather. A sudden cold night can slow seedlings down, damage tender crops, or end your harvest sooner than expected.
Row covers help create a small protected zone around your plants. That extra layer can trap warmth, soften the effects of wind, and shield crops from light frost, giving you more time to grow and harvest.
They are also useful beyond cold protection. Depending on the type you use, row covers can reduce pest pressure, prevent insect damage, and help transplants settle in with less stress.
For beginners, this matters because success often comes down to simple protection. If your seedlings stay warmer and safer during vulnerable weeks, you are more likely to enjoy steady growth and better results.
Quick Answer
To extend the growing season with row covers, place lightweight or medium-weight garden fabric over your crops using hoops or by floating the fabric directly on plants, then secure the edges tightly to trap warmth and protect against wind and light frost. Use lighter covers for insect protection and gentle warming, and heavier covers when colder temperatures are expected.
In spring, row covers help you plant a bit earlier and protect young plants from chilly nights. In fall, they help hold onto daytime warmth so crops like lettuce, spinach, kale, carrots, and beets can keep growing longer.
The key is choosing the right cover weight, installing it before harsh weather arrives, and venting or removing it when temperatures get too warm.
Step-by-Step Guide
1. Understand what row covers do
Row covers are breathable fabrics designed to let in light, air, and water while creating a slightly warmer microclimate around plants. They are usually made from spun-bonded or woven material and come in different weights.
Lighter covers are good for insect protection and mild temperature buffering. Heavier covers provide more frost protection but let in a bit less light.
Think of row covers as a soft blanket for your garden. They do not create tropical conditions, but they can give plants enough of an edge to survive cool nights and continue growing.
2. Choose the right type of row cover
Not all row covers work the same way. Picking the right one depends on your goal and the season.
Lightweight row covers
These are best for:
- Insect protection
- Preventing transplant shock
- Slightly warming the soil and air
- Covering greens and brassicas in mild conditions
They are especially useful in spring when nights are cool but not freezing hard.
Medium-weight row covers
These are best for:
- Light frost protection
- Extending the harvest of cool-season crops
- Giving tender plants extra protection during unstable weather
This is often the most practical choice for home gardeners who want one versatile cover.
Heavyweight row covers
These are best for:
- Stronger frost protection
- Late fall use
- Protecting hardy greens in colder regions
These can be very helpful, but they are not suitable for every situation because they reduce light more than lighter fabrics.
3. Decide which crops to cover
Row covers work best with certain vegetables. Cool-season crops are usually the easiest place to start.
Great crops for row covers include:
- Lettuce
- Spinach
- Arugula
- Kale
- Swiss chard
- Carrots
- Beets
- Radishes
- Turnips
- Broccoli
- Cabbage
You can also use them on tender spring crops like cucumbers, squash, and beans for early protection, but these crops may need the cover removed during flowering if pollinators are needed.
If you are a beginner, start with leafy greens and brassicas. They respond well to the extra protection and are forgiving crops for learning.
4. Time your row covers correctly
Timing matters as much as the cover itself. It is best to install row covers before a cold snap or pest problem arrives, not after damage has already happened.
In spring, put covers in place:
- Right after sowing cool-season crops
- Immediately after transplanting seedlings
- Ahead of cold nights or windy weather
In fall, install covers:
- Before your first expected frost
- While the soil still holds daytime warmth
- As night temperatures begin to dip regularly
A row cover protects best when it captures warmth already present in the soil and around the plants.
5. Pick a support method
There are two main ways to use row covers: floating directly on crops or supporting them with hoops.
Floating row covers
With this method, the fabric rests directly on the plants. This works well for low-growing crops like lettuce, spinach, and young carrots.
It is simple and inexpensive, but you need to make sure the material is light enough that it will not crush tender plants.
Hooped row covers
Hoops lift the fabric above the plants to create a mini tunnel. This gives crops more growing space and improves airflow.
Common hoop materials include:
- PVC pipe
- Metal wire hoops
- Flexible garden tunnel supports
- EMT conduit for stronger long tunnels
For many beginners, hoops are easier to manage because they keep the fabric neat and prevent it from snagging on leaves.
6. Install the row cover properly
A loose, poorly secured cover will not do much good on a windy night. Proper installation makes a big difference.
Follow these steps:
- Water the bed if the soil is dry.
- Place hoops over the row if you are using supports.
- Drape the row cover evenly over the bed.
- Leave enough slack for plant growth.
- Secure all edges with soil, boards, rocks, sandbags, or landscape pins.
- Check for gaps where cold air or insects can enter.
The edges are especially important. Even a high-quality row cover works poorly if wind can lift it or pests can crawl underneath.
7. Monitor temperature and ventilation
Row covers are helpful, but they are not set-and-forget tools. On sunny days, temperatures under the fabric can climb quickly, especially with heavier material.
Check your beds regularly and ventilate when needed. You can lift the sides during the day or remove the cover entirely if weather turns warm.
Watch especially closely when:
- Daytime temperatures rise suddenly
- Tender crops are under heavier covers
- Covers are placed over plastic mulch or warm soil
Overheating can stress plants just as much as cold can.
8. Water and weed under the cover
Most fabric row covers allow rain and overhead watering to pass through, but it is still smart to check the soil often. Windy weather and active plant growth can dry beds out faster than expected.
Try to keep weeds under control before covering the bed. Once the cover is secured, weeds are more annoying to reach and can compete with your crops for light, water, and nutrients.
A quick routine helps:
- Check moisture every few days
- Pull weeds before they get large
- Re-secure edges after watering or windy weather
9. Know when to remove the cover
Eventually, some crops outgrow the need for extra protection. Others need the cover removed so pollinators can do their job.
Remove row covers when:
- The weather has stabilized
- Frost danger has passed
- Plants begin pressing hard against the fabric
- Crops such as squash or cucumbers start flowering and need bees
For fall greens and root crops, you may leave covers on much longer, only opening them to harvest or vent during warm spells.
10. Use row covers with realistic expectations
Row covers are excellent for moderate season extension, but they are not magic. They can add a few degrees of protection, reduce stress, and help crops stay productive longer.
If a hard freeze is coming, one row cover alone may not be enough for tender vegetables. In colder weather, gardeners often combine methods, such as row covers over hoops plus mulch or even low tunnels covered with plastic over the fabric when appropriate ventilation is possible.
The goal is to stretch the season, not completely ignore your climate.
Common Beginner Mistakes
Using the wrong fabric weight
A very light cover may not protect enough during frosty weather. A very heavy cover may reduce light too much or overheat plants in mild conditions.
Match the cover to the season and the crop whenever possible.
Waiting too long to install covers
If you wait until after a freeze warning or after insect damage appears, you lose much of the benefit. Set covers up early so they can prevent problems instead of reacting to them.
Leaving gaps around the edges
This is one of the most common problems. Wind enters, warmth escapes, and insects sneak in.
Take an extra minute to secure every side well.
Forgetting to vent on warm days
Beginners often focus on frost and forget that sunny afternoons can create too much heat under the fabric. Check covers often during weather swings.
Covering crops that need pollination for too long
Cucumbers, melons, squash, and some other fruiting crops may need pollinator access once flowering begins. If the cover stays on too long, fruit set can suffer.
Ignoring wear and tear
Small holes may not seem important, but they reduce protection and let pests in. Inspect your covers regularly and patch or replace damaged material when needed.
Best Tips for Success
Start with one bed
If row covers are new to you, do not feel pressure to protect the whole garden at once. Practice on one raised bed or one short row of greens.
This makes it easier to learn how your local weather affects temperatures under the cover.
Use weather forecasts wisely
Keep an eye on nighttime lows, wind, and sudden temperature changes. Installing a cover one day early is usually better than rushing in the dark before a cold snap.
Focus on cool-season vegetables first
Lettuce, spinach, kale, and carrots are excellent beginner crops for season extension. They already tolerate cool weather, so even a small amount of protection can keep them thriving longer.
Label your cover weights
If you own more than one type, label them clearly so you know which one to grab. This avoids guesswork when the weather changes fast.
Combine row covers with healthy garden habits
Row covers work best when your plants are already in good shape. Healthy soil, steady watering, and proper spacing all help crops make the most of the extra protection.
Check after storms and windy days
Wind can loosen anchors or tear fabric. A quick inspection after bad weather can save your crops from exposure.
Store covers carefully
At the end of the season, dry the fabric, fold it neatly, and keep it in a clean, dry place away from rodents and sharp tools. Good storage helps row covers last much longer.
Recommended Supplies or Tools
You do not need a long list of gear to get started. A simple setup can work very well.
Here are the most useful supplies:
- Lightweight or medium-weight row cover fabric
- Garden hoops or flexible tunnel supports
- Landscape pins, sandbags, rocks, or boards for securing edges
- Scissors or garden snips
- Thermometer or soil thermometer for better temperature tracking
- Frost blankets for extra protection in colder weather
Helpful optional tools include:
- Raised bed clips or clamps for attaching fabric to hoops
- Insect netting for warm-weather pest protection
- A weather app or garden journal to track frost dates and results
If you are choosing between buying several tools at once or keeping it simple, start with fabric, hoops, and a reliable way to anchor the edges. That basic combination is enough for most beginner gardens.
Frequently Asked Questions
How much warmth does a row cover add?
It depends on the fabric weight, weather conditions, and whether the cover is direct on the plants or supported by hoops. In general, row covers provide a few degrees of frost protection rather than dramatic heating.
That small boost is often enough to protect cool-season vegetables from light frost and keep them growing longer.
Can I leave row covers on all the time?
Sometimes, but not always. Cool-season crops can stay covered for extended periods if temperatures remain suitable and airflow is adequate.
However, you should still check for overheating, watering needs, and plant growth. Fruiting crops that need pollinators usually need the cover removed at flowering.
Do row covers keep pests out too?
Yes, lightweight row covers are often used as a physical barrier against insects. They can help protect crops from cabbage worms, flea beetles, and other common pests.
For this to work well, the edges must be sealed so insects cannot crawl inside.
Can row covers protect plants from a hard freeze?
They may help, but a single row cover often is not enough for a severe freeze, especially with tender warm-season plants. Protection improves when row covers are combined with hoops, mulch, or other season-extension methods.
Always match your strategy to your local forecast.
What is the best crop to try first with row covers?
Leafy greens are usually the easiest starting point. Lettuce, spinach, and kale all respond well to row covers and give beginners a clear sense of how season extension works.
Final Thoughts
Learning how to extend the growing season with row covers is one of the most practical skills a home gardener can develop. It does not require a greenhouse, expensive equipment, or advanced experience.
With the right fabric, good timing, and secure setup, you can protect young plants in spring, keep fall crops producing longer, and reduce weather-related setbacks. Even a simple row cover over one bed can help you harvest earlier, harvest later, and feel more confident in your garden.
Start small, observe your results, and adjust as you go. Season extension is often less about perfection and more about giving your plants a little extra help exactly when they need it.