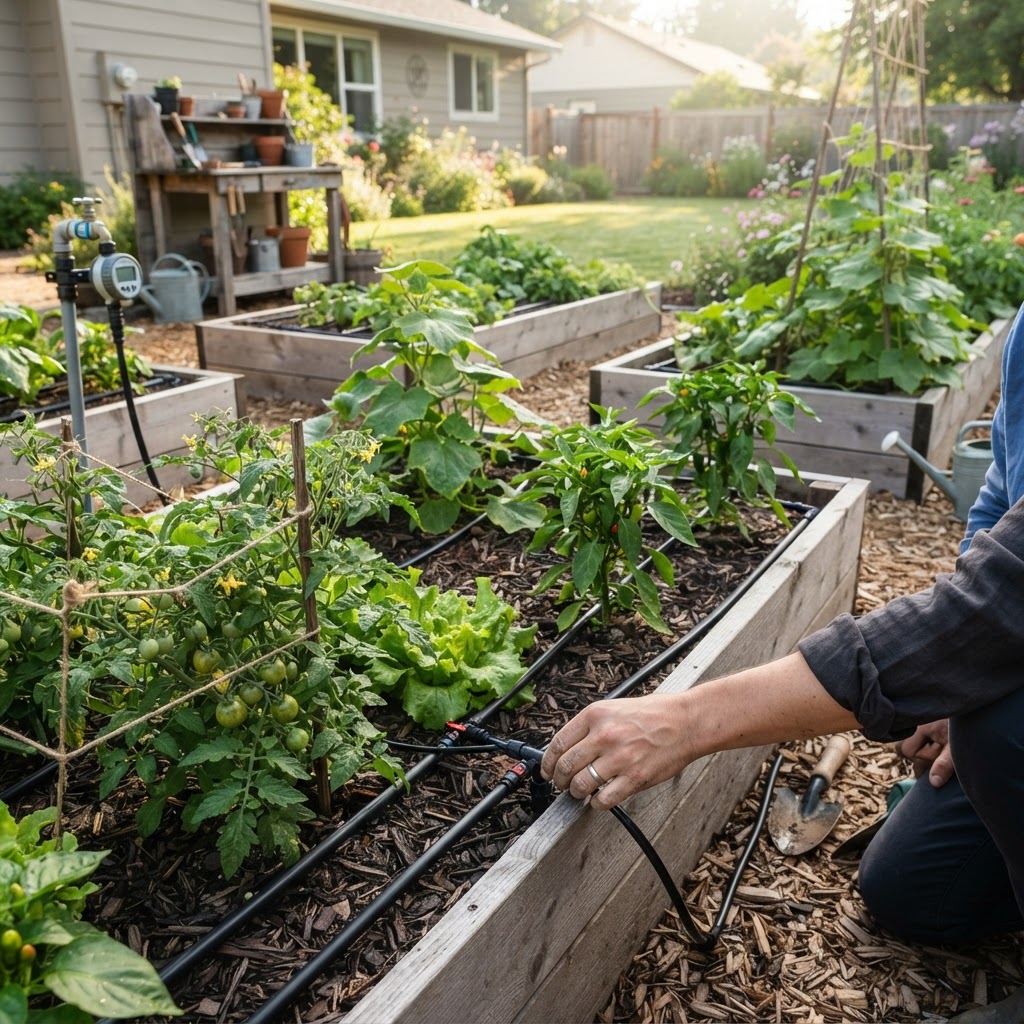
How to Set Up a Drip Irrigation System for Raised Beds: A Beginner-Friendly Guide
If you are tired of dragging a hose around the garden or wondering whether your raised beds are getting enough water, a drip irrigation system can make life much easier. It delivers water slowly and directly to the soil, which helps conserve water, keeps leaves drier, and gives your vegetables more consistent moisture.
The good news is that learning how to set up a drip irrigation system for raised beds is not as complicated as it sounds. With a few basic supplies and a simple plan, even a beginner can build a reliable system in an afternoon.
Why This Topic Matters
Raised beds dry out faster than in-ground gardens, especially during hot weather. Because the soil sits above ground level, it warms up quickly and loses moisture more quickly too.
That can be a challenge for beginner gardeners. If watering is inconsistent, plants may become stressed, grow slowly, or produce fewer vegetables.
A drip irrigation system solves several common problems at once. It helps you water more evenly, reduces runoff, and sends moisture right where roots need it most.
It can also save time. Instead of hand-watering each bed every day, you can turn on the system and let it do the work, or connect it to a timer for even more convenience.
Another big benefit is plant health. Overhead watering can splash soil onto leaves and increase the risk of some diseases, while drip irrigation keeps foliage much drier.
For sustainable vegetable gardening, drip irrigation is a practical choice. It uses water more efficiently and supports healthier, more productive raised beds.
Quick Answer
To set up a drip irrigation system for raised beds, connect a hose bib timer, backflow preventer, pressure regulator, and filter to your outdoor faucet. Then run mainline tubing to your raised beds, attach drip lines or emitter tubing inside each bed, secure everything in place, and test the system for even watering.
For most raised beds, the simplest setup uses 1/2-inch mainline tubing with 1/4-inch drip lines or soaker-style drip tubing laid in rows across the bed. Space the lines so water reaches all plants without overwatering empty areas.
If you are a beginner, start small with one or two beds. Once you see how the system works, it is easy to expand later.
Step-by-Step Guide
1. Measure your raised beds and sketch a simple plan
Start by measuring the length and width of each raised bed. Also measure the distance from your outdoor faucet to the beds.
Draw a basic sketch on paper. Mark where the water source is, where the main tubing will run, and how many drip lines each bed will need.
This quick planning step prevents waste and makes shopping much easier. It also helps you avoid buying too much tubing or forgetting an important connector.
2. Choose the right drip irrigation layout
There are a few ways to water raised beds with drip irrigation. The best option depends on what you grow and how your beds are planted.
For neat rows of vegetables, parallel drip lines work very well. You run several lines across the bed, usually spaced 6 to 12 inches apart depending on plant spacing and soil type.
For mixed plantings, emitter tubing can still work well, especially if your plants are spaced fairly evenly. In small beds, many gardeners use 1/4-inch drip tubing in a grid or loop pattern.
Here are common layout options:
- Parallel drip lines: Great for lettuce, carrots, onions, beans, and other closely spaced crops
- Emitter tubing loops: Useful for mixed raised beds with evenly spaced plants
- Individual emitters: Best for larger plants like tomatoes, peppers, squash, or eggplant
Most beginners find parallel drip lines to be the easiest and most forgiving choice.
3. Gather the essential parts
A basic raised bed drip irrigation system usually includes a few standard components. Each one serves an important purpose.
You will typically need:
- Hose bib timer, if you want automatic watering
- Backflow preventer
- Pressure regulator
- Filter
- 1/2-inch mainline tubing
- 1/4-inch drip tubing or dripline
- Barbed connectors and tees
- End caps or figure-eight end clamps
- Hole punch tool
- Tubing stakes
- Garden hose, if needed to bridge from faucet to garden area
The pressure regulator matters because drip systems work best at lower pressure than a regular outdoor faucet. The filter helps prevent tiny particles from clogging emitters.
4. Assemble the faucet connection
At the faucet, connect your parts in the correct order. This is a small detail that makes a big difference.
The usual order is:
- Timer
- Backflow preventer
- Pressure regulator
- Filter
- Mainline tubing adapter
Some kits combine a few of these pieces, so always check the instructions that come with your supplies. Once everything is connected, hand-tighten the fittings firmly but avoid over-tightening.
5. Lay out the mainline tubing
Run the 1/2-inch mainline tubing from the faucet to the raised beds. Try to keep the route simple and direct.
You can lay the tubing along paths, edges of beds, or other low-traffic spots. Use stakes to keep it neat and prevent it from shifting.
If the tubing is stiff, place it in the sun for 10 to 15 minutes first. Warm tubing is much easier to straighten and connect.
6. Run water to each raised bed
When the mainline reaches a raised bed, you have a few choices. You can run the mainline along one side of the bed and branch 1/4-inch tubing into it, or in some cases run the mainline directly through larger beds.
For many home gardens, the easiest approach is to keep the 1/2-inch tubing outside or along the edge of the bed and use connectors to feed several 1/4-inch drip lines inside the bed.
Use a hole punch to make openings in the mainline. Then insert barbed connectors and attach the smaller tubing.
7. Place drip lines inside each bed
Now lay the drip lines across the soil surface in each raised bed. For most vegetable beds, lines spaced about 8 to 12 inches apart are a good starting point.
In sandy soil, water spreads less, so lines may need to be closer together. In clay-heavy soil, water spreads wider and more slowly, so spacing can sometimes be a bit wider.
A typical 4-by-8-foot raised bed often uses:
- 3 to 5 drip lines running the 8-foot length
- Lines spaced evenly across the 4-foot width
- Emitters placed according to the drip tubing design, often every 6, 9, or 12 inches
Secure each line with tubing stakes so it stays in place. Keep the lines close enough to plant roots, but not so crowded that installation becomes messy.
8. Cap the ends and flush the system
Before you finish, cap the ends of the tubing. Many gardeners use figure-eight clamps or end caps that can be removed later for cleaning.
Then flush the system. Open the ends briefly and turn on the water to push out dirt or bits of plastic from installation.
After flushing, close the ends and turn the system back on. Check that water is flowing evenly through all lines.
9. Test coverage and adjust
Let the system run for a short cycle and inspect the beds. Look for dry spots, leaks, or areas getting too much water.
Check whether the moisture is reaching the root zone. You can gently dig into the soil a few inches after watering to see how far the water has spread.
Make adjustments as needed. You may need another drip line in a wide bed, tighter spacing for thirsty crops, or fewer emitters where plants are sparse.
10. Add a timer schedule
A timer makes drip irrigation much easier to manage. It also helps you water consistently, which is important for crops like tomatoes, cucumbers, lettuce, and peppers.
As a starting point, many raised bed gardens do well with deep watering a few times a week rather than a light sprinkle every day. The exact schedule depends on your weather, soil, crop type, and mulch.
A simple beginner approach is:
- Water early in the morning
- Start with 20 to 40 minutes per session
- Adjust frequency based on heat, rainfall, and soil moisture
Always check the soil before increasing watering time. More water is not always better.
Common Beginner Mistakes
Installing too few drip lines
One of the most common mistakes is assuming one line can water an entire raised bed. In reality, water spreads outward only so far, especially in loose raised bed soil.
If lines are too far apart, plants between them may stay too dry. It is better to use enough lines for even coverage from the start.
Skipping the pressure regulator or filter
A regular faucet can put out more pressure than drip tubing is designed to handle. Without a pressure regulator, fittings may pop off or tubing may wear out faster.
Skipping the filter can also lead to clogged emitters over time. These two small parts are worth using.
Watering on a fixed schedule without checking the soil
Timers are helpful, but they should not replace observation. Cool spring weather, heavy mulch, or recent rain can all reduce how often your beds need water.
Push your finger into the soil or use a moisture meter if you like. The goal is consistently moist soil, not constantly wet soil.
Poor layout planning
If the tubing route is awkward, it can become a tripping hazard or make harvesting and bed maintenance harder. Planning ahead keeps the system cleaner and easier to use.
Try to place tubing where it will not interfere with walking paths, bed access, or trellises.
Forgetting to flush and inspect the system
Even a well-built drip system needs occasional checks. Small clogs, chewed tubing, or loose fittings can reduce performance.
A quick inspection every week or two can prevent bigger problems later.
Best Tips for Success
Mulch after installation
Mulch works beautifully with drip irrigation. A layer of straw, shredded leaves, or untreated grass clippings helps reduce evaporation and keeps soil moisture more stable.
That means your drip system can work more efficiently. It also helps suppress weeds.
Group crops with similar water needs
Tomatoes and cucumbers usually need different watering than onions or herbs. If possible, organize your beds so crops with similar needs share the same irrigation zone.
This makes scheduling much easier and can improve plant health.
Start simple and expand later
You do not need a perfect, large-scale setup right away. Begin with one or two beds and learn how the water moves through your soil.
Once you are comfortable, you can add more lines, more beds, or even separate zones.
Use removable end caps
End caps that open easily make seasonal maintenance much simpler. You can flush the lines during the growing season and drain them before winter if needed.
That small convenience can save time year after year.
Observe plants, not just the timer
Your vegetables will tell you a lot. Wilting in the afternoon can be heat-related, but persistent drooping, slow growth, or blossom end rot may point to watering issues.
Keep an eye on the plants and adjust your system as the season changes.
Recommended Supplies or Tools
You do not need fancy equipment to build a good raised bed drip system. A few reliable parts are enough.
Here is a simple shopping list:
- Battery-powered hose timer: Helpful for automatic watering
- Backflow preventer: Protects household water supply
- Pressure regulator: Reduces faucet pressure to drip-safe levels
- Filter: Helps prevent clogging
- 1/2-inch poly tubing: Main water supply line
- 1/4-inch dripline or emitter tubing: Waters the raised beds
- Barbed tees, elbows, and couplers: Connect tubing sections
- Hole punch tool: Makes clean holes in mainline tubing
- Tubing stakes: Holds lines in place
- End clamps or caps: Closes tubing ends neatly
- Mulch: Helps the system perform better
If you are shopping online, look for drip irrigation kits made for raised beds or small vegetable gardens. Just make sure the kit includes the pressure regulator and filter, or be ready to add them separately.
A pair of garden pruners or sharp scissors is also useful for cutting tubing cleanly. Clean cuts make assembly much easier.
Frequently Asked Questions
How many drip lines do I need in a raised bed?
It depends on the bed width, soil type, and plant spacing. For a typical 4-foot-wide raised bed, 3 to 5 evenly spaced drip lines are common.
Closer spacing may be helpful in sandy soil or for closely planted crops. Wider spacing can work in heavier soil with larger plants.
Should I put drip lines under mulch?
Yes, in most cases that works very well. Place the drip lines on the soil surface first, test the system, and then add mulch over the top.
This helps reduce evaporation and protects the tubing from direct sun exposure. Just be sure the lines remain accessible for inspection.
How long should I run drip irrigation in raised beds?
There is no single perfect number because it depends on your emitters, soil, weather, and crops. A common starting point is 20 to 40 minutes, two to four times per week.
Then adjust based on how moist the soil stays a few inches down. Deep, consistent watering is usually better than frequent shallow watering.
Can I connect a drip system to a rain barrel?
Yes, but it depends on water pressure. Many standard drip systems are designed for pressurized water, so a gravity-fed rain barrel may not provide enough pressure without a pump or a low-pressure setup.
If you want to use a rain barrel, check that your drip components are compatible with low-pressure systems.
Is drip irrigation better than hand watering for raised beds?
For many gardeners, yes. Drip irrigation is more consistent, more water-efficient, and usually easier to maintain over time.
Hand watering can still work well, especially for small gardens, but drip irrigation makes it much easier to keep moisture levels steady.
Final Thoughts
Learning how to set up a drip irrigation system for raised beds is one of the most useful upgrades you can make in a vegetable garden. It saves time, uses water more efficiently, and helps your plants get the steady moisture they need to grow well.
If you are new to drip irrigation, keep it simple. Start with a basic layout, test it carefully, and make small improvements as you learn how your raised beds behave.
Once your system is in place, daily watering becomes much less stressful. You will spend less time hauling hoses and more time enjoying healthy, productive vegetables.